Show a splash screen while the content is loading without further delaying the app startup time. Maybe even throw in some small animations and you’ll have a great first impression.
We previously had a look at how to add a splash screen by using android:windowBackground to display a drawable while the app is loading, so let’s go a step further and keep showing the splash screen for a bit longer until we are done loading our content!
Aligning Views is Hard…
…aligning views with the window background is even harder. If you’ve tried to align your content with the window background before, you might have come to realize that it’s trickier than it looks. The window background draws behind the status and navigation bar, which leads to the background not being exactly centered. It’s even worse when you take different device rotations and split screen into account—I’m dreading foldable devices already.
To create an our splash screen we need to…
- Overlay a splash view that aligns with the window background
- Load & initialize the content beneath the splash overlay
- Animate the overlay and reveal the content once loading is finished
We want to overlay our content, so what about window.addContentView()? It promises to […] add an additional content view to the screen. Added after any existing ones in the screen. This sounds like what we want!
Let’s try this and add a view on top of our content. We’ll use the same background for the view as we did for the window background.
public class MainActivity extends Activity {

  @Override
  protected void onCreate(@Nullable Bundle savedInstanceState) {
    super.onCreate(savedInstanceState);
    setContentView(R.layout.activity_main);

    final View view = new View(this);
    view.setBackgroundResource(R.drawable.splash_screen);
    final ViewGroup.LayoutParams layoutParams =
        new ViewGroup.LayoutParams(MATCH_PARENT, MATCH_PARENT);

    final Window window = getWindow();
    window.addContentView(view, layoutParams);
  }
}
…and—as you might have guessed—it won’t align correctly. (I used some lines to visualize the different drawable centers. Orange is the window background, white the overlay.)
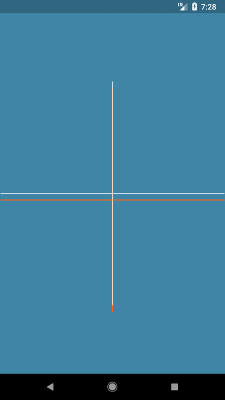
As mentioned before, the window background draws within the full size of the screen, including the height of the status and navigation bar, but our View can’t get any bigger. It’s already filling the parent’s dimensions. We can’t make it fill the whole screen without possibly interfering with our main content. It would be easier if we could just draw the overlay as if it filled the whole screen, so why not create our own SplashView?
This is a very basic implementation of View. We take a drawable and update its dimensions in onLayout to make sure everything is initialized correctly. With getRootWindowInsets(), we can read the size of the status and navigation bar, which in turn we can use to offset the drawable. It won’t actually draw outside of our view’s bounds (because our view gets clipped) but we don’t have to: This is about correctly aligning the drawable!
public class SplashView extends View {
private Drawable splashDrawable;
public SplashView(@NonNull Context context) {
super(context);
}
public void setSplashDrawable(@DrawableRes int drawable) {
splashDrawable = ContextCompat.getDrawable(getContext(), drawable);
splashDrawable.setCallback(this);
}
@Override
protected void onLayout(boolean changed, int left, int top, int right, int bottom) {
super.onLayout(changed, left, top, right, bottom);
final WindowInsets windowInsets = getRootWindowInsets();
splashDrawable.setBounds(
-windowInsets.getSystemWindowInsetLeft(),
-windowInsets.getSystemWindowInsetTop(),
getWidth() + windowInsets.getSystemWindowInsetRight(),
getHeight() + windowInsets.getSystemWindowInsetBottom());
}
@Override
protected void onDraw(Canvas canvas) {
super.onDraw(canvas);
splashDrawable.draw(canvas);
}
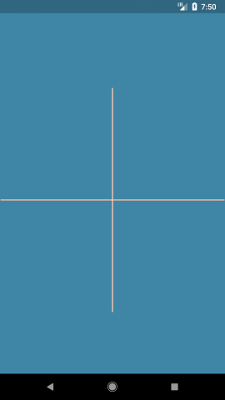
}We just need to update our code to use the new custom view.
final SplashView splashView = new SplashView(this);
splashView.setSplashDrawable(R.drawable.splash_screen);
// ...

final Window window = getWindow();
window.addContentView(splashView, layoutParams);
Lo and behold, it’s aligning perfectly now!
The hardest part is over. We can load our content, and once it’s done, we remove the view again. But I promised an animated splash screen. Let’s see how we could go about that.
…but Animating them is Fun
I’m going to use a CircularReveal because it works really well for this use case. Once we finish loading we can create an animator and animate the view away. And don’t forget to remove the view when you’re finished!
public class MainActivity extends Activity {

  @Override
  protected void onCreate(@Nullable Bundle savedInstanceState) {
    super.onCreate(savedInstanceState);
    // ...


    window.addContentView(splashView, layoutParams);

    // "load our content" for 1s, then reveal it!

    new Handler().postDelayed(() -> reveal(splashView), 1000);
  }

  private void reveal(View view) {
    final int width = view.getWidth();
    final int height = view.getHeight();
    final int centerX = width / 2;
    final int centerY = height / 2;
    final int radius = Math.max(width, height);
    final Animator reveal =
        ViewAnimationUtils.createCircularReveal(view, centerX, centerY, radius, 0F);
    reveal.setDuration(300);

    // remove view after the animation ends

    reveal.addListener(new RemoveViewListener(view));
    reveal.start();
  }

  private static class RemoveViewListener implements Animator.AnimatorListener {

    private final View view;

    private RemoveViewListener(View view) {
      this.view = view;
    }

    private void removeView() {
      final ViewGroup parent = (ViewGroup) view.getParent();
      if (parent != null) {
        parent.removeView(view);
      }
    }

    @Override
    public void onAnimationEnd(Animator animation) {
      removeView();
    }

    @Override
    public void onAnimationCancel(Animator animation) {
      removeView();
    }

    @Override
    public void onAnimationStart(Animator animation) {}

    @Override
    public void onAnimationRepeat(Animator animation) {}
  }
}
And that’s all it takes. We can add a view on top of our content to continue showing our splash screen while we finish the initialization and fetch the data to display.

You might guess where this is headed… so let’s do it! I used a <layer-list> to create a background with an icon in its center. By assigning an id with <item android:id="@+id/icon"> we can fetch the element and animate it at runtime.
<?xml version="1.0" encoding="utf-8"?>
<layer-list xmlns:android="http://schemas.android.com/apk/res/android">
    <item>
        <color android:color="@color/colorPrimary"/>
    </item>

    <item android:id="@+id/icon">
        <bitmap
            android:gravity="center"
            android:src="@mipmap/ic_launcher_foreground"/>
    </item>
</layer-list>
It’s quite a bit of boilerplate, but all we do here is fetch the icon inside the layer list, then animate it up and down by some offset. We then create an AnimatorSet to play our translation followed by the reveal we built previously.
private void createSplashAnimation(SplashView view) {
  final Drawable drawable = ((LayerDrawable) view.getDrawable()).findDrawableByLayerId(R.id.icon);

  final float dp100 = getResources().getDimension(R.dimen.animation_offset);

  final ValueAnimator splashAnimator = ValueAnimator.ofInt(0, (int) dp100, 0);
  splashAnimator.setDuration(450);
  splashAnimator.setInterpolator(new AnticipateOvershootInterpolator());
  splashAnimator.setRepeatMode(ValueAnimator.RESTART);
  splashAnimator.setStartDelay(100);
  splashAnimator.setRepeatCount(1);

  final Rect drawableBounds = drawable.copyBounds();
  final int top = drawableBounds.top;
  final int left = drawableBounds.left;
  splashAnimator.addUpdateListener(
      animation -> {
        drawable.copyBounds(drawableBounds);
        int value = (int) animation.getAnimatedValue();
        drawableBounds.offsetTo(left, top - value);
        drawable.setBounds(drawableBounds);
      });

  final AnimatorSet animatorSet = new AnimatorSet();
  final Animator revealAnimator = reveal(view);
  animatorSet.playSequentially(splashAnimator, revealAnimator);

  // remove view after the animation ends

  animatorSet.addListener(new RemoveViewListener(view));

  animatorSet.start();
}
If you try running this, you’ll notice that nothing is happening. This is because the view needs to allow animations to be scheduled. To register our drawable with our view, we add the following to our SplashView:
@Override
protected boolean verifyDrawable(@NonNull Drawable who) {
  return who == splashDrawable || super.verifyDrawable(who);
}
And that’s it…We have a proper splash screen now!

With Great Power…
Even though we can use the same approach to delay showing the content for as long as we want, we shouldn’t. A splash screen should only be displayed as long as necessary—and not a millisecond longer. Your users will thank you.
But this was only to showcase what’s possible. As you might have noticed I used an API available for 23+ (getRootWindowInsets()) as well as circular reveal (21+). To be backwards compatible we need to find reliable alternatives to those methods, which is why I created a small Splash Screen Library that does all of the things we dicussed in this article also for lower API versions.